Blog Cation
Remember - to participate, you must become a member over at Scrapbooking Fun
Weeks 2, 3, and 4
All entries submitted for the contest will receive double entries into the grand prize drawing if they are on time for the weekly contest. If entered later, you will receive single entries per item.
On with the Blog-Cation
Week 2 – Embellishment Bag – decided to keep it easy as I was so busy . What to include –
• 3 yards of ribbon – I have a yards of green plaid, 40” of green grosgrain, and 1 yard of green polka dot
• 40 green bling
• 5 green star eyelets, 10 green mini eyelets, 12 green mini brads
• Green skittles
• A few green primas and other paper flowers
Why am I putting all of this together now? It will actually save me time in the long run. I enjoy doing swaps so often, that I sometimes use things for swaps that I had intended for other projects. This way, I have the items in a baggie and at a minimum, I will have these items at assembly time in May.

Week 3 – create some deco squares
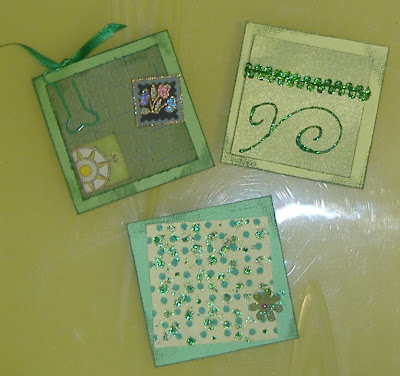
Deco squares are normally 3”x3”, layered twice and embellished at least once. For my deco squares, I again hit my scraps first! I found some pretty polka dot flocked paper along with some leftover green. I also found a shiny polka dot and some other plain green cardstock. Note: you can make yours all identical or all different – your choice.
1st – cut 3 pieces of plain cardstock 3”x3”
2nd – cut 3 pieces of pp 2.5” x 2.5”
Next – trim edges and ink, if desired. Then adhere tops to bottoms.

Then embellish. The first two are fairly straightforward – ribbon and stickles on one, stickles and a flower on the other. For the third – a paper clip and satin ribbon and then I raided my inchie swap stash! One of the best things about swaps is using them!!! Anyway the one of the inchies was created by Crop-a-holic and the other has D# as creator. I think they are from the old AMR board. I popped up one of the inchies. I know it isn’t 100% green, but I really like the way it is with the papers, plus, I know of a few pictures I would like it for.

Week 4 – Create a large Photo Mat (will hold a 4x6 photo)
I am checking my stash first – I need a base that will measure 5x7. I have a piece!
First – cut a 5x7 base
Next I usually cut a 4x6 mat to show where the photo goes.

Then decide how to embellish. I am making some edged photo corners – basic triangles. I have enough scraps left that I made two more photo corners (not swap size, just for this mat) that I will hang onto. I really like eyelets, so use some of those for embellishment.
Remember – your items are not required to be just like mine. Mine are more of a jump off point – have fun and create what is you!

No comments:
Post a Comment